How to Fix “NET::ERR_CERT_COMMON_NAME_INVALID” (Certificate Name Mismatch)
Your certificate is valid but was issued for a different name. Learn how to read the SAN list, fix www and subdomain gaps, and stop the server sending the wrong certificate.
You type your address, and instead of your site the browser shows “Your connection is not private” with the code NET::ERR_CERT_COMMON_NAME_INVALID. Firefox calls the same problem SSL_ERROR_BAD_CERT_DOMAIN, and Safari says “This Connection Is Not Private” and mentions that the certificate is for a different website. The certificate is usually not expired or forged. It simply does not list the exact hostname you asked for.
Under the hood, your browser asked the server for www.example.com, the server answered with a certificate that only names example.com (or a hosting company’s own hostname, or another customer’s site), and the browser refused to continue. Site owners see this most often right after a migration, after adding a subdomain, after pointing a domain at a CDN, or when only one of the www and bare versions of the domain was included in the certificate.
What is happening
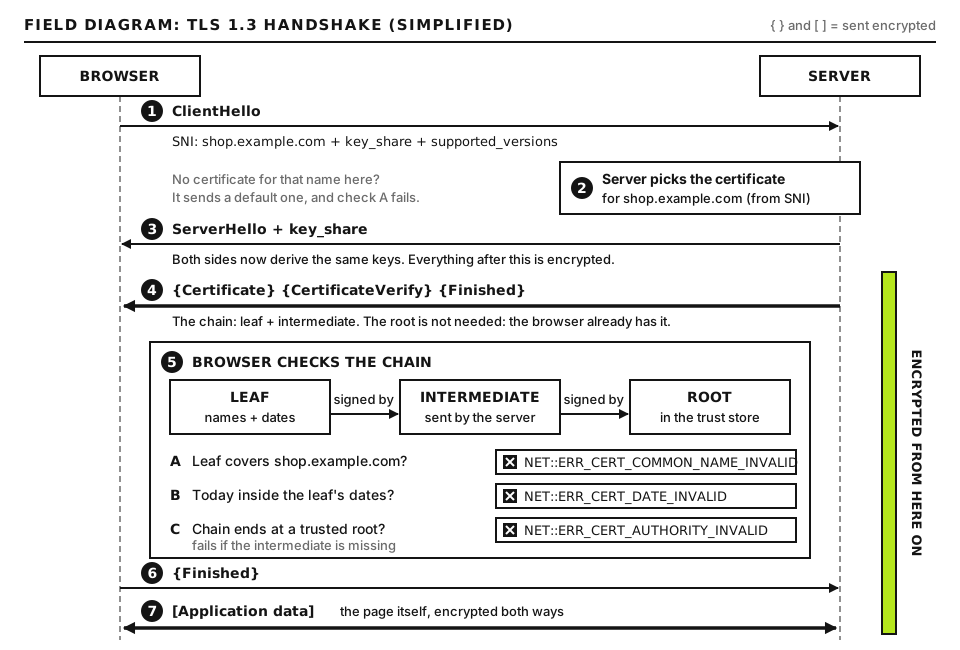
When a browser opens an HTTPS connection it performs a TLS handshake. In the first message, called the ClientHello, it sends the hostname it wants in an extension called Server Name Indication (SNI). The server uses that name to choose which certificate to send back. The browser then checks that the certificate is signed by a trusted authority, that it is in date, and that the hostname in the address bar matches one of the names the certificate lists.
The server picks a certificate by SNI. If no name on it matches, the browser stops. Open full size
That last check is the one failing here. Modern browsers match only against the Subject Alternative Name (SAN) extension. The older Common Name (CN) field in the certificate subject is ignored by Chrome and other current browsers for this purpose, which is why the error code still says “common name” even though the CN is not what decides the result. If a name is not in the SAN list, it does not count.
Name in the certificate SAN
Covers
Does not cover
example.com
example.com only
www.example.com, shop.example.com
www.example.com
www.example.com only
example.com
*.example.com
www.example.com, shop.example.com, any single label
example.com itself, a.b.example.com
*.shop.example.com
eu.shop.example.com
shop.example.com, www.example.com
The wildcard rule trips up a lot of people. An asterisk matches exactly one label, meaning one piece between dots. It never matches the bare domain and never matches two levels deep. A certificate for *.example.com plus example.com is the common pairing for that reason.
There are five real-world ways to end up with a mismatch:
Missing name: the certificate was issued without www, without the bare domain, or without a subdomain you now use.
Wrong server:DNS (often a forgotten AAAA record for IPv6) sends some visitors to an old server that holds a different certificate.
Wrong virtual host: the right server answers, but its SNI lookup fails and it sends its default certificate, often the server’s own hostname or another site on the same IP.
CDN or proxy coverage: a CDN such as Cloudflare terminates TLS, and its edge certificate does not include the hostname.
Panel coverage: a hosting panel’s automatic certificate (AutoSSL or a Let’s Encrypt button) skipped a name because its DNS did not point at the server when the certificate was issued.
Before you start
You need access to your DNS provider, your hosting control panel (or SSH to the server), and your CDN dashboard if you use one. Write down your current DNS records and copy any web server config file before you edit it.
How to run the commands in this guide. Most checks here run on your own computer, because you want to see what the public internet sees. On macOS and Linux, open Terminal; openssl, curl and dig are normally installed (on some Linux systems dig comes in a package called dnsutils or bind-utils). On Windows, the easiest route is WSL (Windows Subsystem for Linux), which gives you the same tools; curl.exe also ships with Windows 10 and 11, and PowerShell has Resolve-DnsName as a stand-in for dig. Commands marked as server commands run in an SSH session on the web server. If you host WordPress and need wp-cli, run it from the site folder (the one containing wp-config.php); depending on your host the command is wp or wp-cli.
You can also read the certificate in the browser through the icon left of the address and the certificate viewer’s Details tab. For guided checks, our diagnostic tools page links to certificate testers.
Step 1: Find out which names the certificate actually covers
Start by reading the certificate the server sends for the failing hostname. This single command answers most cases.
Run this on your computer. Replace www.example.com in both places with the exact hostname that shows the error. -connect sets the host and port to dial. -servername sends that name as SNI, exactly as a browser would (OpenSSL 1.1.1 and newer also send SNI automatically from the -connect host, but stating it keeps the test explicit). </dev/null closes the connection straight away instead of waiting for input. The second openssl x509 reads the certificate and prints the subject, the issuer, the validity dates and the SAN extension.
Here both names are covered, so if the browser still complains, move to Step 3 because some visitors are reaching a different server. Bad output looks like DNS:example.com alone when you tested www, or a name you do not recognize such as DNS:server1.HOSTNAME.net or another customer’s domain. A foreign name means the server sent the wrong certificate (Step 4). Your own domain with a name missing means the certificate needs reissuing (Step 2). The issuer line also tells you who issued it: if it says Cloudflare or Google Trust Services while you expected Let’s Encrypt from your host, a CDN is answering (Step 5).
Check every hostname you publish, not just the one a visitor reported.
Step 2: Fix www versus the bare domain (and other missing names)
The most common single cause is a certificate that names only one of example.com and www.example.com. Your redirect may send everyone to the covered name, but the browser checks the certificate before it ever sees the redirect. A visitor who types the uncovered name hits the warning, not the redirect.
Confirm it
Run the Step 1 command for both names. If one shows the error and its SAN list lacks that name, this is your cause.
Fix it
Make sure both names resolve to the server first, because the certificate authority must validate each name. Then reissue the certificate with both names. In a hosting panel this is usually a checkbox list of domains in the SSL or Let’s Encrypt section; check both and reissue. If you manage Certbot yourself, run this on the server:
Replace example.com with your domain. Each -d adds one name to the certificate, and the first one becomes the certificate’s main name. --nginx uses the Nginx plugin to validate and install; use --apache for Apache, or certonly --webroot -w DOCUMENT_ROOT if you install the files yourself, where DOCUMENT_ROOT is the folder your site is served from. --expand tells Certbot to replace the existing certificate with a bigger one instead of creating a second, separately named certificate. Good output ends with “Successfully received certificate” and a deploy message. Bad output usually shows a validation failure for one name, such as a 404 on the challenge URL or a DNS problem; that name does not point at this server yet, so fix its DNS record and run the command again.
For subdomains, either list each one with its own -d, or use a wildcard. Let’s Encrypt only issues wildcards through the DNS-01 challenge, which means your ACME client must be able to create a TXT record at your DNS provider (through a DNS plugin and API token, or a panel that manages your DNS). Remember that a wildcard does not cover the bare domain, so request example.com and *.example.com together, and that a wildcard is one level only: dev.shop.example.com needs its own name or its own wildcard.
Step 3: Check DNS for a second server, especially IPv6
If the certificate looked fine in Step 1 but some visitors still see the error, they may be landing somewhere else. The classic case is an old AAAA (IPv6) record still pointing at a previous host. Your own connection might use IPv4 and look fine, while visitors on IPv6 networks, including many mobile carriers, reach the old machine and its old certificate.
Run these on your computer, replacing www.example.com with the failing hostname. +short prints only the answers. A asks for IPv4 addresses, AAAA for IPv6 addresses, and CNAME shows whether the name is an alias for another hostname. On Windows PowerShell, use Resolve-DnsName www.example.com -Type AAAA. Good output shows only the addresses of your current server or CDN. Bad output shows an extra address you do not recognize, or an AAAA record when your new server has no IPv6 at all.
Then test each address directly, sending the right SNI, to see what certificate it holds:
SERVER_IP is an IPv4 address from the dig output, and SERVER_IPV6 is an IPv6 address from it, kept inside square brackets so the colons are not confused with the port. If one address returns the right SAN list and the other does not, delete or correct the stale record at your DNS provider. Expect the old answer to linger until the record’s TTL (time to live) expires.
Step 4: Fix SNI and the default certificate on a shared server
Most servers host many sites on one IP address. When a TLS connection arrives, the web server looks at the SNI name and picks the matching virtual host. If no virtual host matches, it falls back to a default, and the default sends its own certificate. That is how you end up seeing the server’s hostname or a stranger’s domain in the SAN list.
Both run on your computer. -noservername (OpenSSL 1.1.1 and newer) deliberately sends no SNI, which shows you the server’s fallback certificate. If the first command shows your domain and the second shows something else, the server is fine for modern browsers and only very old clients that never send SNI will see the mismatch. If both show the wrong name, the server has no HTTPS virtual host matching your hostname, so it is always falling through to the default.
Fix it on Nginx
Check that an HTTPS server block lists every hostname. This is a file you edit on the server, typically under /etc/nginx/sites-available/ or /etc/nginx/conf.d/:
Replace example.com with your domain and the paths with your real certificate and document root. server_name is what Nginx compares against the SNI name, so a missing www here sends www visitors to the default server. The listen [::]:443 line covers IPv6; without it, IPv6 visitors land on whatever block does listen on IPv6. http2 on; is the syntax in Nginx 1.25.1 and newer; on older versions put http2 on the listen line instead. Run sudo nginx -t to test (good output says “syntax is ok” and “test is successful”), then sudo systemctl reload nginx. The block marked default_server on port 443, or the first one loaded if none is marked, answers unmatched names.
Fix it on Apache
On Apache, each name must appear as ServerName or ServerAlias inside a <VirtualHost *:443> block. Run sudo apachectl -S (or apache2ctl -S) on the server. It lists every virtual host by port; the first one listed for port 443 is the default for names that match nothing. If your domain is missing from the 443 section entirely, the SSL virtual host was never created, which is common when a site was added by hand on port 80 only.
A hosting panel builds these files for you. If you are on managed or shared hosting, the panel equivalent is to make sure the domain or alias was added to the right site, then reissue SSL for it.
Step 5: Check CDN coverage
If the issuer in Step 1 is your CDN rather than your host, the CDN is presenting its edge certificate and your origin certificate is irrelevant to this error. With Cloudflare, the free Universal SSL certificate covers the zone apex and first-level subdomains, such as example.com and www.example.com. It does not cover deeper names such as dev.shop.example.com. For those, Cloudflare documents three options: enable Total TLS, order an Advanced Certificate, or upload a custom certificate. Note that Cloudflare often reports an uncovered deep subdomain as ERR_SSL_VERSION_OR_CIPHER_MISMATCH rather than a name error, because there is no certificate to send at all; that variant is covered in our handshake guide.
In the Cloudflare dashboard, go to SSL/TLS, then Edge Certificates, and confirm the certificate status is Active and the hostnames list includes the name you need. If the hostname is set to DNS only (gray cloud), Cloudflare is not involved for that name and the origin’s certificate must cover it.
Step 6: Check hosting panel AutoSSL coverage
Panel tools such as cPanel AutoSSL and similar Let’s Encrypt buttons validate each name before including it. A name whose DNS points elsewhere, or that sits behind a CDN that blocks the validation request, is quietly skipped, and the panel issues a certificate for the rest. The site works on one name and fails on the other.
Open the panel’s SSL status page. Most show each domain with a status and a reason such as “DNS does not resolve to this server” or “HTTP validation failed”. Fix the DNS for each skipped name, wait for the TTL to pass, and run the AutoSSL check or reissue. If the domain uses a CDN proxy, either use DNS validation, temporarily set the record to DNS only during issuance, or install a CDN origin certificate and set the CDN to Full (strict) mode.
Advanced: Reading the full handshake and certificate
When the simple checks do not explain the result, look at the whole conversation. This prints every certificate the server sends, which helps when the leaf certificate is right but you suspect a proxy or a misconfigured chain:
Run this on your computer. -showcerts prints each certificate in the chain as a PEM block, not just the first. -verify_hostname makes OpenSSL perform the same name check a browser does. In the output, the lines that start with 0 s: and i: describe certificate zero, the leaf: s: is its subject and i: is the issuer. Near the end, Verify return code: 0 (ok) means both the chain and the name passed. Verify return code: 62 (hostname mismatch) confirms a name problem. A return code about an unable-to-get-issuer or self-signed certificate is a chain problem instead, which our guide on authority errors covers.
To see the full set of fields for one certificate, save the leaf to a file and read it all:
The first line saves the leaf certificate as leaf.pem in your current folder. The second prints every field. Look for the X509v3 Subject Alternative Name block, the Not After date and the Issuer. If you want to see every certificate ever issued for your domain, including ones from a forgotten host or panel, search Certificate Transparency logs at crt.sh for your domain; every publicly trusted certificate is logged there, which makes it a good way to spot an old server still running a certificate for your name.
When to contact your host
If the server keeps sending a certificate you did not request, or your panel will not include a name even though DNS is correct, open a ticket. Send:
The exact hostnames that fail and the ones that work.
The output of the Step 1 command for each failing hostname, including the subject, issuer and SAN lines.
The output of the dig A and AAAA commands, and which IP addresses you expect.
Whether a CDN is in front, and the certificate status shown in its dashboard.
The UTC time you tested and what changed recently, such as a migration, a new subdomain or a DNS move.
If the site is down for everyone and you need a structured triage path, use our Emergency Room. Expired certificates and renewal failures are a different problem, covered in our guide to ERR_CERT_DATE_INVALID.
Did this fix it?
Still stuck? Start again from what you can see in the Emergency Room.
Still stuck?
Print a free one-page checklist to keep, or open the Emergency Room if the symptom does not match.
Your SSL certificate expired, or the visitor’s clock is wrong. Confirm which with one command, renew the certificate, and fix the DNS, CAA or blocked-challenge problem that stopped it renewing.
Works in your browser but fails on Android, curl or an API client? The server is probably missing its intermediate certificate. Learn to test and fix the chain.
Your free certificate will not issue or renew. Read the validation error, then fix DNS, the Cloudflare proxy, blocked .well-known paths, CAA records, port 80 or rate limits.