How to Fix “NET::ERR_CERT_AUTHORITY_INVALID”, Self-Signed Certificates and Incomplete Chains
Works in your browser but fails on Android, curl or an API client? The server is probably missing its intermediate certificate. Learn to test and fix the chain.
Chrome shows “Your connection is not private” with NET::ERR_CERT_AUTHORITY_INVALID. Firefox says “Warning: Potential Security Risk Ahead” with SEC_ERROR_UNKNOWN_ISSUER or MOZILLA_PKIX_ERROR_SELF_SIGNED_CERT. Or, more confusingly, the site looks fine on your laptop but a payment gatewaywebhook, a mobile app, an older Android phone or a script reports “SSL certificate problem: unable to get local issuer certificate”, “unable to verify the first certificate”, CERTIFICATE_VERIFY_FAILED or “PKIX path building failed”.
Every one of these means the client could not build a chain of trust from your certificate back to a root certificate it already trusts. Either the certificate was never issued by a public authority (self-signed), the server forgot to send the intermediate certificate that links your certificate to the root, or something between the visitor and your server replaced your certificate with its own. Developers, agencies wiring up integrations, and anyone who installed a certificate by hand see this most.
What is happening
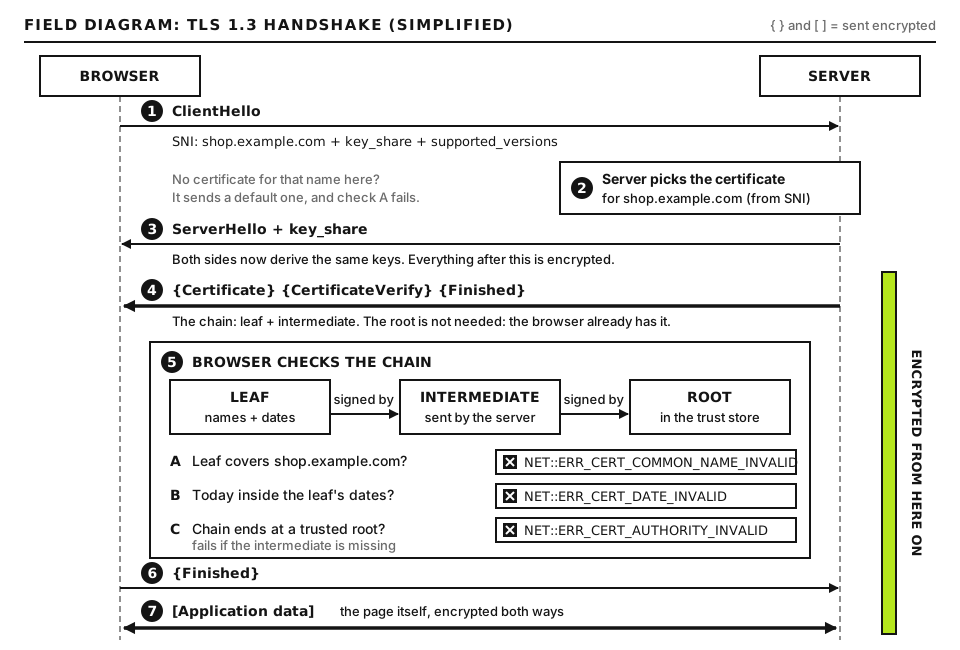
A public certificate is the bottom link of a chain. A root certificate authority, whose certificate is built into operating systems and browsers, signs an intermediate certificate. The intermediate signs your certificate (the leaf). During the TLS handshake your server must send the leaf and the intermediates. The client supplies the root from its own trust store and checks each signature up the chain.
The server must send the intermediate. The browser supplies only the root. Open full size
Link
Example (Let’s Encrypt)
Who provides it
Root
ISRG Root X1
The client’s trust store
Intermediate
A Let’s Encrypt intermediate such as YR1 (R11 on older certificates)
Your server must send it
Leaf
example.com
Your server must send it
The “works in my browser” trap comes from how different clients handle a missing intermediate. Your leaf contains an Authority Information Access (AIA) field with a URL for its issuer. Chrome on desktop can follow that URL and download the missing intermediate on the fly, and Firefox ships a preloaded set of known intermediates. Desktop browsers also cache intermediates they have seen on other sites. So a broken server can look perfect in a desktop browser. Command line tools such as curl and wget, programming language libraries (PHP, Python, Node.js, Java, Go), most server-to-server integrations, and many mobile apps do no such fetching. They see a leaf with no path to a root, and they fail.
The other causes are simpler. A self-signed certificate is its own issuer, so no client trusts it unless you install it manually. TLS interception by antivirus software or a corporate proxy replaces your certificate with one signed by the interceptor’s own root, which only devices with that root installed will trust.
Before you start
You need SSH or panel access to the server where the certificate is installed, and to know which web server or panel manages it. Copy any config file before editing, and never delete the private key file; if you lose it you must reissue the certificate.
How to run the commands in this guide. Chain tests run on your own computer to see what the public gets: on macOS and Linux use Terminal; on Windows use WSL, which gives you the same openssl and curl. (macOS ships LibreSSL as openssl; a package manager install gives you OpenSSL with every flag used here.) Commands marked as server commands run in an SSH session on the web server. If your site is WordPress and you need wp-cli, run it in the site folder containing wp-config.php, as wp or wp-cli depending on your host. If you cannot use a terminal, our diagnostic tools page lists online chain checkers.
Step 1: Identify which kind of authority error you have
Start with curl, because it does not fetch missing intermediates and so shows the server’s true state. On your computer:
Replace example.com with the failing hostname. -v prints the handshake and certificate details, -o /dev/null discards the page, 2>&1 sends curl’s diagnostics into the pipe, and grep -iE keeps only the relevant lines. Good output includes SSL certificate verify ok. Bad output and what it means:
unable to get local issuer certificate: the chain is incomplete or the issuer is not trusted on this machine. Most often a missing intermediate. Go to Step 2.
self-signed certificate (the issuer equals the subject): a self-signed certificate. Go to Step 4.
self-signed certificate in certificate chain: the chain ends at a root the client does not trust, which is typical of interception or a private certificate authority. Go to Step 5.
Also read the issuer line. If it names a public authority such as Let’s Encrypt, Sectigo, DigiCert or Google Trust Services, the certificate is genuine and the chain is the problem. If it names your server, a panel, “localhost”, or an antivirus or security product, the certificate is not a public one.
Step 2: Test the chain the server sends
Ask the server for everything it sends during the handshake. On your computer:
-connect sets host and port, -servername sends the hostname as SNI, -showcerts prints every certificate the server sent rather than just the first, and the grep keeps the summary lines. Replace example.com with your hostname in both places. Good output looks like this:
 0 s:CN = example.com
   i:C = US, O = Let's Encrypt, CN = R11
 1 s:C = US, O = Let's Encrypt, CN = R11
   i:C = US, O = Internet Security Research Group, CN = ISRG Root X1
Verify return code: 0 (ok)
This is sample output from an older Let’s Encrypt certificate; your intermediate names will differ. Current Let’s Encrypt chains use intermediates such as YR1 or YE1 and include an extra cross-signed root, so you may also see a certificate 2. Certificate 0 is the leaf, and its issuer (i:) is R11. Certificate 1 is R11 itself, and its issuer is the root, which the client already holds. Each i: line should match the s: line of the next certificate down. Bad output has only certificate 0 and ends with Verify return code: 21 (unable to verify the first certificate) or 20 (unable to get local issuer certificate). That is a missing intermediate. Another bad pattern is a certificate 1 whose subject does not match certificate 0’s issuer, which means the wrong intermediate was installed, such as an old one left over from a previous certificate.
Step 3: Fix an incomplete chain by serving the full chain file
The fix is to configure the server with a file that contains the leaf followed by its intermediates. Certbot and most ACME clients write several files. With Certbot they live in /etc/letsencrypt/live/example.com/:
File
Contains
Use it for
fullchain.pem
Leaf plus intermediates
The certificate setting in Nginx and modern Apache
privkey.pem
Private key
The key setting
cert.pem
Leaf only
Almost never on its own; using it here causes this error
chain.pem
Intermediates only
Legacy chain settings and OCSP stapling configs
Nginx
In the HTTPS server block (a file you edit on the server):
Replace example.com with the folder name Certbot used, which is usually the first domain on the certificate; sudo certbot certificates lists it. Nginx has no separate chain directive, so if this points at cert.pem the intermediate is never sent. Test with sudo nginx -t (good output says “test is successful”) and reload with sudo systemctl reload nginx.
Apache
Since Apache 2.4.8, SSLCertificateFile accepts the full chain, and the old SSLCertificateChainFile directive is deprecated:
Same placeholder as above. Run sudo apachectl configtest (good output: “Syntax OK”) and reload Apache.
Certificates bought from a commercial authority
Commercial authorities usually email a zip containing your certificate and a “CA bundle” or “intermediate” file. Build a full chain yourself, leaf first, then the intermediates in order, on the server:
cat YOUR_DOMAIN.crt CA_BUNDLE.crt > fullchain.pem
YOUR_DOMAIN.crt is the leaf file from the zip and CA_BUNDLE.crt is the intermediate or bundle file; names vary by vendor. Order matters: the leaf must come first. Do not include the root; clients already have it and sending it only adds bytes. In a hosting panel, the equivalent is to paste the bundle into the “Certificate Authority Bundle” or “CABUNDLE” box when installing the certificate.
Re-run the Step 2 test afterward. You should now see certificate 0 and certificate 1 and Verify return code: 0 (ok).
Step 4: Replace self-signed certificates
Self-signed certificates turn up in predictable places: a new server before a real certificate was issued, a control panel or webmail on its own port, a staging site, a NAS, and the default certificate a web server uses when no site matches. If a public visitor sees one on your main site, the real certificate is missing or the wrong virtual host answered (our name mismatch guide covers that second case).
The fix for anything on the public internet is a free, publicly trusted certificate. Use your panel’s Let’s Encrypt or AutoSSL option, or Certbot, for the hostname, including panel hostnames. Most panels let you set a certificate for the server’s own hostname separately from the sites.
For local development, a tool such as mkcert creates a local certificate authority, installs it in your own machine’s trust stores and issues certificates from it, so your local sites work without warnings. That trust exists only on your machine, which is exactly what you want.
For an internal service that an integration must reach, the safe answer is to make the client trust the specific certificate authority, not to turn verification off:
Run this on your computer or the client machine. INTERNAL_CA.pem is the certificate of the authority that signed the staging certificate (for a self-signed certificate, the certificate itself), and staging.example.com is your internal hostname. --cacert tells curl to trust that file for this request. Good output shows the page and no certificate error. The -k or --insecure flag skips verification entirely; it is fine for a one-off diagnosis, never for production code, because it also accepts an attacker’s certificate.
Step 5: Rule out TLS interception
If the error happens on one computer or one office network but not elsewhere, something local is probably intercepting HTTPS. Antivirus products with “HTTPS scanning” or “SSL/TLS filtering” features, corporate secure web gateways, parental control software and some public Wi-Fi systems all do this. They decrypt your connection and re-encrypt it with their own certificate.
Confirm it
Open the certificate viewer from the address bar on the affected machine and read the issuer. If it names an antivirus or security vendor, a company name, or anything other than the authority you installed, the connection is being intercepted. Compare with the Step 2 output from a different network, such as a phone on mobile data. Firefox may show MOZILLA_PKIX_ERROR_MITM_DETECTED, which states this directly.
Fix it
Nothing on your server can fix this, because your server is never involved. On a personal machine, update the security product or turn off its HTTPS scanning feature. On a managed corporate machine, the IT team must deploy their root certificate to the browser or application that fails; Firefox, for example, can be set to trust the operating system’s enterprise roots. Command line tools, language runtimes and containers often use their own trust bundles, which is why interception breaks them even when the browser works.
Step 6: Check the client’s trust store and pinning
If the chain is complete and verified on your computer, but one specific client still fails, the client may not trust the root, or it may be pinning an old certificate.
Outdated trust stores
Let’s Encrypt chains now end at ISRG Root X1, or at ISRG Root X2 for some ECDSA chains. The old cross-signature from IdenTrust’s DST Root CA X3, which let Let’s Encrypt certificates work on very old devices, expired on 30 September 2024, and Let’s Encrypt stopped offering that longer chain during 2024. Devices whose trust stores never received ISRG Root X1, including Android versions older than 7.1.1, can no longer validate Let’s Encrypt certificates by default. The same applies to old servers and containers with stale CA bundles. The fix is on the client: update the operating system or the CA certificates package (for example ca-certificates on Linux), or, for a legacy audience you must serve, use a certificate from an authority whose root those devices still trust.
Let’s Encrypt’s hierarchy keeps evolving. In 2024 it moved issuance to new intermediates (names such as R10 and R11 for RSA, E5 and E6 for ECDSA). In September 2025 it generated a new “Generation Y” hierarchy, announced that November: new roots ISRG Root YR and ISRG Root YE, cross-signed by X1 and X2, with intermediates named YR1, YR2, YE1 and so on. At the time of writing, its Chains of Trust page lists YR1, YR2, YE1 and YE2 as the active intermediates and the R and E series as retired. Default chains now run leaf, YR1, Root YR, ISRG Root X1 (or leaf, YE1, Root YE, ISRG Root X2, ISRG Root X1). Check the Chains of Trust page on letsencrypt.org for the current list before hardcoding anything. Let’s Encrypt also picks an intermediate at random for each issuance, so two renewals in a row can chain through different intermediates.
Certificate pinning
Pinning means an app or integration accepts only a specific certificate or public key, not anything a trusted authority signed. A pin on your leaf breaks at every renewal. A pin on a single intermediate breaks as soon as the authority uses a different one, which for Let’s Encrypt can happen at the next renewal. Symptoms are an app that fails right after a routine renewal while every browser is fine.
If you control the app, pin to the root or to a set of keys with backups, or drop pinning and rely on normal validation plus Certificate Transparency monitoring. On Android, the Network Security Config file supports a pin set with an expiration date so a stale pin fails open. If a third party pins your certificate, tell them before each certificate change and send them the new chain.
Advanced: Verifying a chain offline with openssl verify
To prove exactly which link is broken, split the chain into files and verify it locally. On your computer, save the certificates the server sends:
This writes cert1.pem (the leaf), cert2.pem (the first intermediate) and so on into your current folder. example.com is your hostname. The awk program starts a new file at each BEGIN line and stops copying at each END line. If only cert1.pem appears, the server sent no intermediate.
-untrusted supplies intermediates that may be used to build the chain but are not trusted on their own; the root comes from your system trust store. Good output for the first line is cert1.pem: OK. The second line, with no intermediates supplied, simulates a client without AIA fetching: error 20 at 0 depth lookup: unable to get local issuer certificate there is normal and is exactly why the server must send the intermediate. If the first line also fails with error 20, the file you saved as cert2 is not the right issuer for your leaf. To test against a specific root rather than your system store, add -CAfile ROOT.pem, where ROOT.pem is the root certificate downloaded from the authority.
Before installing a new certificate, check it belongs to your private key. These two commands, run on the server, should print the same hash:
fullchain.pem and privkey.pem are your certificate and key files; with a full chain file, openssl x509 reads the first certificate, the leaf. Matching hashes mean the pair belongs together. Different hashes mean the certificate was issued for another key, and the web server will refuse to start or fail every handshake.
When to contact your host
If you are on managed hosting and the server sends only one certificate in Step 2, or the certificate is self-signed on a public site, open a ticket. Send:
The hostname and the exact error from each failing client (browser code, curl message, app log line).
The Step 2 openssl s_client -showcerts summary, including the Verify return code.
Which clients work and which fail, and whether the failure happens on every network.
The UTC time of your tests and any recent changes, such as a renewal, a manual certificate install or a migration.
If the main site is down for visitors, start at our Emergency Room. Expired certificates and renewal failures are covered in our ERR_CERT_DATE_INVALID guide.
Did this fix it?
Still stuck? Start again from what you can see in the Emergency Room.
Still stuck?
Print a free one-page checklist to keep, or open the Emergency Room if the symptom does not match.
Your certificate works but the padlock is missing or parts of the page fail to load. Find every http:// reference and fix it at the source, including builder data.
Your SSL certificate expired, or the visitor’s clock is wrong. Confirm which with one command, renew the certificate, and fix the DNS, CAA or blocked-challenge problem that stopped it renewing.
Your free certificate will not issue or renew. Read the validation error, then fix DNS, the Cloudflare proxy, blocked .well-known paths, CAA records, port 80 or rate limits.