Website Under a Traffic Flood or DDoS Attack: What to Do
Your site is buried under traffic. Tell an attack from a viral spike, put Cloudflare in front, challenge or rate limit the hot paths, and lock your origin so it cannot be bypassed.
Your site is timing out or showing 503, 508 or 504 errors. The host’s graphs show requests or bandwidth far above normal, or the host has emailed to say your site is “under attack” or has been temporarily limited. You have not launched anything and no one has mentioned you on social media. You may be facing a traffic flood, also called a denial of service (DoS) attack, or a distributed one (DDoS) when the traffic comes from many machines at once.
The goal of a flood is simple: send more requests than your server can answer so that real visitors get nothing. Some are aimed at a business deliberately; many hit small sites as collateral damage or as test runs. This guide shows you how to tell an attack from a genuine traffic spike, what kind of attack you are facing, and how to absorb it at the edge and keep it from coming straight back to your server. Everything here is defensive: it is about protecting a site you own or manage.
What is happening
Floods come in two broad kinds, and they are fought in different places.
Aspect
Layer 7 (application) flood
Volumetric (network) flood
What arrives
Ordinary-looking HTTP requests, often to expensive pages: search, login, cart, uncached URLs with random query strings
Raw packets (UDP floods, reflection and amplification attacks) measured in gigabits per second
What breaks
PHP workers, CPU and database, while network capacity is fine
The network link itself, before any request reaches the web server
Access logs look quiet, but the server is unreachable or extremely slow to connect
Who can stop it
A CDN or WAF in front of the site, plus caching and rate limits; partly the web server
Only the network upstream: your host’s provider or a DDoS protection network such as Cloudflare
A WordPress page that is not cached may take a few hundred milliseconds of PHP and database time to build. A cached page costs almost nothing. That is why layer 7 floods target uncached URLs: a few hundred requests per second to a search URL can tie up every PHP worker on a modest server, while the same number of cached page views would barely register.
On shared hosting, you cannot absorb either kind yourself. Your site shares a server and network with others, so the host protects everyone by rate limiting your account, suspending the site or, for volumetric attacks, null-routing the targeted IP address (dropping all traffic to it upstream). That is not punishment; it is the only lever they have. A VPS gives you more control over layer 7 defenses, but a volumetric flood still has to be stopped upstream of your server.
Before you start
Access you need: your access logs (control panel or SSH), your DNS provider, and the Cloudflare dashboard if you use it. If you do not use a CDN yet, have your domain registrar login ready, because moving DNS to Cloudflare is often the fastest fix.
Backup: config changes here are reversible, but note every setting before you change it so you can undo it when the attack ends.
How to run commands: log commands (awk, sort) run on the server over SSH. WP-CLI is wp or wp-cli, run from the site folder that holds wp-config.php. dig and curl run on your own computer: built in on macOS and Linux; on Windows use WSL, curl.exe and Resolve-DnsName in PowerShell.
Log locations:/var/log/nginx/access.log, /var/log/apache2/access.log or /var/log/httpd/access_log on a VPS; the “Raw access logs” area of your control panel on shared hosting.
Step 1: Tell a flood from a genuine spike
A viral post and an attack can both take a site down, but the cure differs. A real spike needs more caching and capacity; an attack needs filtering. Spend five minutes with the logs before you start blocking.
Placeholder:ACCESS_LOG is your access log path. Field 4 holds the timestamp; taking 17 characters keeps it to the minute, for example 07/Nov/2026:14:05. Reading it: a smooth ramp that rises and falls over hours is typical of real interest. A wall that jumps from dozens to thousands per minute in one step, and stays flat, suggests automation.
These count the top requested paths (field 7), the top client IPs (field 1), the top user agents and the top referrers (fields 6 and 4 when you split the combined log format on double quotes). If your site is behind Cloudflare and the IPs are all Cloudflare’s, configure real IP logging first (Apache mod_remoteip or Nginx real_ip_header CF-Connecting-IP).
Signal
Genuine spike
Likely attack
Paths
One or a few real articles or product pages, plus their images, CSS and JS
One path hammered without its assets; search URLs (/?s=); random query strings like /?x8f2k=; wp-login.php, xmlrpc.php or /wp-json/
Referrers
Social networks, news sites, newsletters, search engines
Empty, or your own domain on every request
User agents
A natural mix of current browsers and phones
One identical string, outdated browser versions, scripting libraries, or random-looking strings
IPs
Thousands of IPs each making a handful of requests
A few IPs making thousands, or many IPs from a few hosting networks
Behavior
Visitors load pages, then images, then click on
Only HTML requests, no assets, often only POST or only HEAD
If the requests are mostly crawlers and aggressive bots rather than a flood (a steady CPU drain rather than a sudden outage), the bots and CPU guide (FG-36) is the better fit. If the flood is login attempts, see the brute-force guide (FG-82).
If the logs are quiet
If the site is unreachable but the access log shows little traffic, requests are not getting as far as the web server. That points to a volumetric attack or a network problem upstream, and only your host or a DDoS protection network can fix it. Skip to Step 3 and Step 6.
Step 2: Cache everything that can be cached
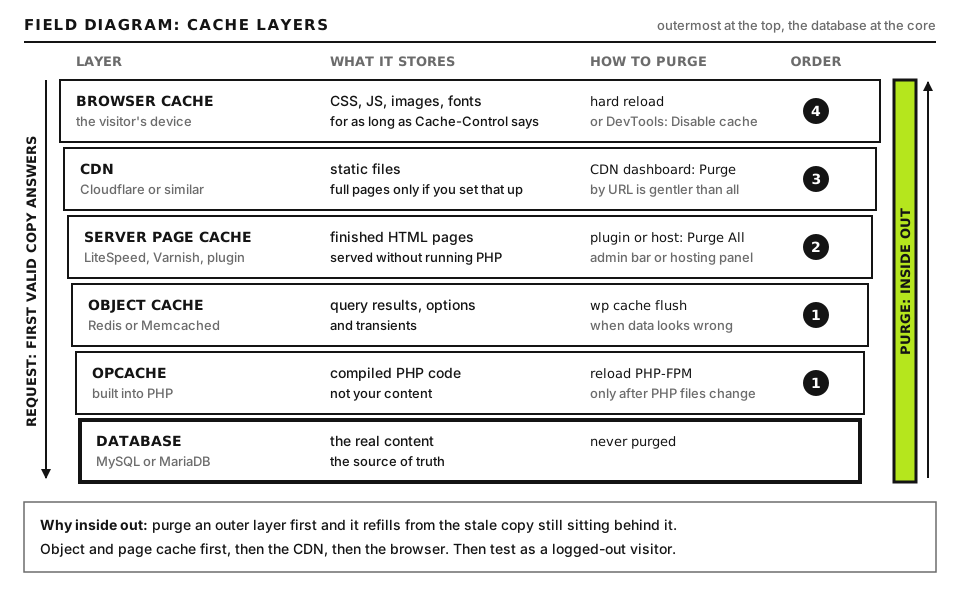
Every request answered from cache is one your server never sees. During a flood, caching is the cheapest defense you have.
Every request a cache answers is one your server never has to build. Open full size
Page cache: make sure a page caching plugin or server cache is active, so anonymous visitors get static HTML.
Edge cache: by default Cloudflare caches static files but not HTML. A Cache Rule (Caching, then Cache Rules) set to Eligible for cache for HTML can let Cloudflare serve whole pages. Exclude anything personal: /wp-admin/, /wp-login.php, cart, checkout and account pages, and any request carrying a wordpress_logged_in_, wp-postpass_, woocommerce_items_in_cart or wp_woocommerce_session_ cookie. Getting this wrong can show one visitor’s cart to another, so test while logged out and logged in.
Short edge TTLs are fine: even caching HTML for one or two minutes collapses thousands of identical requests into a handful of origin hits.
Placeholders:example.com is your domain and SOME_PAGE is a normal public page. -s hides progress and -I fetches headers only. Good output:cf-cache-status: HIT on a second request, or an age header greater than zero. Bad output:DYNAMIC, BYPASS or MISS every time, meaning every request still reaches your server.
Step 3: Use Cloudflare’s attack controls
If the site is not behind Cloudflare or a similar network yet, putting it there is often the single most effective move. Add the site, let it import your DNS, check every record, switch the records that serve your website to Proxied (orange cloud), then change the nameservers at your registrar. Nameserver changes can take time to spread, so start now; the Cloudflare DNS move guide (FG-67) covers doing it without breaking email. Cloudflare’s network-level DDoS protection applies to proxied traffic on every plan.
Under Attack Mode
In the zone’s overview page, the Quick Actions sidebar has an Under Attack Mode toggle. When on, every visitor gets an interstitial challenge that a real browser passes automatically within a few seconds, and that most attack tools cannot. Cloudflare describes it as a last resort, and it has costs: API clients, payment gateway webhooks, uptime monitors and some apps cannot pass it, and analytics will dip. Use it to get the site back, then replace it with narrower rules as soon as you can. To apply it only to part of the site, create a Configuration Rule for that path and set the security level to I’m Under Attack.
Challenge rules for hot paths and sources
Under Security, then Security rules, choose Create rule, then Custom rules. Use Edit expression to paste one of these and set the action to Managed Challenge:
(http.request.uri.query contains "s=" and http.request.uri.path eq "/")
(http.request.uri.path eq "ATTACKED_PATH")
(ip.src.country in {"COUNTRY_CODE"} and not http.request.uri.path contains "/wp-json/")
(ip.src.asnum in {ASN_NUMBER})
Placeholders:ATTACKED_PATH is the path topping your Step 1 list, such as /product/some-item/. COUNTRY_CODE is a two-letter ISO code such as those Cloudflare shows in its security analytics; only challenge a country where you have few real visitors. ASN_NUMBER is the network number of a hosting provider sending the flood, shown next to each IP in Cloudflare’s analytics. What they do: the first challenges WordPress search requests on the home page; the second protects a single targeted URL; the third and fourth challenge traffic from a source that dominates the attack, while the /wp-json/ exclusion keeps API calls working. The Free plan allows five custom rules. Good result: the security events view shows the rule matching most of the flood while your origin request rate drops. Bad result: real customers reporting challenges in a loop, which usually means a rule is too broad.
Keep webhooks working: if a payment gateway, form service or app must reach your site, create a custom rule above the others that matches its path and uses the Skip action for the relevant checks.
A rate limiting rule
Under the same Security rules page choose Create rule, then Rate limiting rules. On the Free plan you get one rule, matched on URI path, counted per IP over a 10 second window with a 10 second block. Point it at the attacked path with a threshold a human would never reach, such as 20 requests per 10 seconds. Paid plans allow longer windows and blocks, and higher plans add more match fields and counting options. Rate limiting is most useful against a few heavy IPs; for an attack spread across thousands of IPs each sending a little, challenges work better.
Step 4: Find out whether your origin IP is exposed
Cloudflare only protects traffic that goes through it. If attackers know your server’s real IP address, they can send requests straight to it and every edge rule is bypassed. Signs of this are a flood that continues in your access log even after Under Attack Mode is on, with requests whose client IPs are not Cloudflare ranges. Check what your DNS reveals:
dig +short A example.com
dig +short MX example.com
dig +short A mail.example.com
dig +short TXT example.com | grep spf
Run these on your own computer, replacing example.com with your domain and mail.example.com with the host your MX record names. +short prints only the answers. Good output: the first returns Cloudflare addresses; MX points at a separate mail provider; the SPF record lists only that provider. Bad output: the mail host or any unproxied record (often mail, ftp, cpanel, webmail or direct) resolves to the same IP as your web server, or the SPF record includes your server’s IP with ip4:. Any of these hands out your origin address.
Also remember DNS history: services that record past DNS answers may still show the IP your domain used before you moved behind Cloudflare. Email sent by WordPress itself can carry the server’s IP in its Received headers. If the origin IP has ever been public, assume the attacker can find it.
Test whether your origin answers directly, bypassing Cloudflare:
Placeholders:ORIGIN_IP is your server’s IP from your hosting dashboard. --resolve forces curl to connect to that IP while still sending your domain name, -k skips certificate checks (origin certificates are often not publicly trusted) and -w prints only the status. Good output once locked down: a timeout or a 403. Bad output:200, meaning anyone with the IP can reach your site without passing Cloudflare.
Step 5: Lock the origin to Cloudflare
Once all web traffic goes through Cloudflare, tell the server to refuse web requests that do not. Cloudflare publishes its ranges at https://www.cloudflare.com/ips/ (with plain text lists at /ips-v4 and /ips-v6), and those ranges change rarely.
Firewall (VPS): allow ports 80 and 443 only from Cloudflare ranges, then drop other traffic to those ports, using iptables, nftables, ufw or your cloud provider’s security group. Keep SSH reachable from your own IP before you apply anything.
Web server: in Nginx, an allow line per Cloudflare range followed by deny all; in the server block; in Apache, Require ip lines for each range. This is weaker than a firewall because the server still accepts the connection, but it stops PHP from running.
Authenticated Origin Pulls: Cloudflare can present a client certificate to your server, which you configure the web server to require. This proves the request came through Cloudflare, not just from a Cloudflare IP.
Cloudflare Tunnel: an outbound-only connection from your server to Cloudflare, so the server needs no open web ports at all.
Change the IP: if the origin address was exposed, ask your host for a new IP after locking down, and never publish it in DNS again.
On shared hosting you usually cannot change the firewall; ask your host whether they offer Cloudflare-only access or can apply it for you.
Advanced: what to log for later
An attack is miserable while it lasts, but good records make the next one shorter and help your host or provider act. Keep:
A timeline in UTC: when the slowdown began, when you noticed, each change you made and when the site recovered.
Log extracts: copy the access logs for the attack window before rotation deletes them. Save the top paths, IPs, ASNs, countries and user agents you found.
Cloudflare evidence: export or screenshot the security events and analytics for the window, including the rules that matched and the Ray IDs of sample blocked requests.
Server metrics: CPU, memory, PHP worker usage and bandwidth graphs from your host’s dashboard.
Rules you added: list each temporary rule with its expression, so you can relax them in order when the attack ends rather than leaving them forever.
If the attack came with a ransom or extortion demand, do not pay or reply; save the message and report it to the relevant authorities in your country along with your evidence.
Afterward, review which pages were slowest to build under load. Pages that cannot be cached (search, filtering, cart fragments) are the ones attackers will aim at next time, so make them cheaper or put them behind a challenge permanently.
When to contact your host
Contact your host early, ideally as soon as you confirm an attack, and always if the logs are quiet but the site is unreachable. Include:
The UTC time the attack began and whether it is ongoing.
Your domain, the server IP and whether you use Cloudflare.
Top paths, IPs or ASNs and user agents from Step 1, with request counts.
Cloudflare Ray IDs or event exports if you have them.
What you have changed so far, with times.
Ask them whether the traffic is volumetric or application-layer from their view, whether they have null-routed or rate limited your IP, and whether they can filter upstream or provide a new IP. Our diagnostic tools help you check DNS and headers from outside, and the Emergency Room covers other reasons a site can go down.
Did this fix it?
Still stuck? Start again from what you can see in the Emergency Room.
Still stuck?
Print a free one-page checklist to keep, or open the Emergency Room if the symptom does not match.
Browsers show a red warning before your site loads. Confirm which blocklist flagged you, find the phishing kit or malware behind it, then get reviewed by Google and the other vendors.
Thousands of POSTs to wp-login.php and xmlrpc.php are slowing your site. Measure the attack in your logs, then layer 2FA, attempt limits, an xmlrpc block and edge rules.
CPU pegged and pages crawling, but no real traffic spike? Read your access logs to find the bots, verify fake Googlebots, and rate limit or block them at the right layer.