How to Set Up Microsoft 365 Email on Your Domain Correctly (MX, Autodiscover, SPF, DKIM and DMARC)
Connect your domain to Microsoft 365 the right way: verification, MX, autodiscover, SPF, DKIM in the Defender portal and DMARC, plus what to do about website SMTP mail.
You bought Microsoft 365 so your team can use Outlook with addresses on your own domain. The admin center lists a set of DNS records to add, a status that stays on “Incomplete setup”, and later a Defender portal page that says DKIM is not enabled. Meanwhile Outlook on someone’s laptop keeps asking for a password, mail still arrives at the old host, or the website’s contact form fails with an SMTP authentication error.
This guide takes you through each record Microsoft 365 needs, explains what it does, and shows you how to confirm it is right before moving on. It is for business owners and the designers who set up client email. If your website and email are hosted at different companies, the separate guide on website and email at different providers explains the overall DNS layout. Authentication failures in general are covered in the separate guide on email going to spam after a DNS change.
What is happening
Microsoft 365 email is Exchange Online. To work with your domain it needs proof that you own the domain, an MX record so the world delivers your mail to Exchange Online, an autodiscover record so Outlook and phones can find the right settings, and sender authentication records so receivers trust mail you send.
The admin center shows the exact values for your tenant. Always copy those rather than typing from an example. Microsoft documents every record at learn.microsoft.com, and that is the place to check if anything here looks different from your screen.
About the MX value
For years the MX target was built from your domain with dots replaced by hyphens, followed by .mail.protection.outlook.com, at priority 0. Microsoft has been moving newly added domains to targets under mx.microsoft, which supports DNSSEC, and the exact format can include a segment you cannot predict. Do not build the value yourself; copy it from the admin center.
Before you start
You need a Global Administrator account in Microsoft 365 and login access to the DNS host for your domain (find it with dig NS example.com +short). Export or screenshot the current DNS zone. If you are moving existing mailboxes, plan the migration first; the separate guide on moving email without losing mail covers the order of events.
DNS checks run on your own computer with dig (built into macOS and Linux; on Windows use Resolve-DnsName in PowerShell or dig in WSL). Exchange Online PowerShell commands run on your computer in PowerShell after installing the ExchangeOnlineManagement module and connecting with Connect-ExchangeOnline -UserPrincipalName ADMIN_ADDRESS, where ADMIN_ADDRESS is your admin sign-in. WordPress checks run over SSH in the site folder containing wp-config.php, with wp or wp-cli depending on your host.
A day ahead, lower the TTL on your existing MX and SPF records to 300 seconds so mistakes can be corrected quickly.
Step 1: Add and verify the domain
In the Microsoft 365 admin center go to Settings, then Domains, then Add domain. Enter the domain. If your registrar supports automatic setup, Microsoft may offer to sign in and add records for you; that is fine, but still check the results afterward. Otherwise choose to add a TXT record and copy the MS=ms value.
dig example.com TXT +short | grep MS=
Replace example.com with your domain. +short prints only the values and grep filters for the token. Good: the exact MS=ms value from the admin center. Nothing returned means the record is missing, in the wrong DNS zone, or was saved with a doubled host such as example.com.example.com. Click Verify once it resolves.
After verification, the wizard asks how you want to connect the domain and which services to set up. Choose Exchange (email) at minimum. It then lists the records for Steps 2 to 4.
Step 2: Point the MX record at Exchange Online
Delete every existing MX record at the root of your domain, then add one MX record with priority 0 and the target from the admin center.
dig example.com MX +short
Good output is exactly one line, for example 0 example-com.mail.protection.outlook.com. or the mx.microsoft target you were given. Bad output is any additional MX record, especially your old host’s server at a lower or equal priority number. Senders try the lowest number first, so a leftover record can capture some of your mail.
Send a test from an outside account to a new mailbox. If it lands in the old host’s webmail, a resolver still has the old record cached; wait for the old TTL and check again.
Step 3: Add the autodiscover CNAME
Outlook and many mail apps look up autodiscover to find mailbox settings. Add a CNAME with host autodiscover and target autodiscover.outlook.com.
dig autodiscover.example.com CNAME +short
Good: autodiscover.outlook.com.. Bad: an A record pointing at your web host, or an old CNAME to your previous provider. That is a common cause of Outlook repeatedly asking for a password or connecting to the wrong server after a move. Some web hosts create an autodiscover record automatically for their own mail service. If your website host’s control panel recreates it, disable the host’s email service for the domain or ask them to stop managing that record.
The admin center may also list records for Teams and device management, such as enterpriseregistration and enterpriseenrollment CNAMEs. Add them if you use those services; they are not needed for email to flow.
Step 4: Publish SPF
If Microsoft 365 is your only sender, use:
v=spf1 include:spf.protection.outlook.com -all
This is the value of one TXT record at the root. include:spf.protection.outlook.com authorizes Exchange Online’s outbound servers; -all (hard fail) says nothing else is allowed. That is only safe when you are sure nothing else sends as your domain. If your website, newsletter service or invoicing tool sends with your domain in the From address, add each one to the same record, for example v=spf1 include:spf.protection.outlook.com include:SENDER_INCLUDE -all, where SENDER_INCLUDE is the value that service documents. Use ~all while you are still discovering senders.
dig example.com TXT +short | grep spf1
Good: one line starting "v=spf1 containing include:spf.protection.outlook.com. Bad: two separate SPF records, which causes SPF to fail for everything, or an old include for your previous mail host that you no longer need. Remember the ten-lookup limit; every include counts, along with those nested inside it.
Step 5: Enable DKIM
Out of the box, Microsoft 365 signs outgoing mail for custom domains using your tenant’s onmicrosoft.com domain. That signature passes DKIM but does not align with your domain for DMARC. Enabling DKIM for your domain fixes that.
Get the two CNAME records
Open the Microsoft Defender portal (security.microsoft.com), then Email & collaboration, Policies & rules, Threat policies, Email authentication settings, and the DKIM tab. Select your domain. If no keys exist yet, create them. The details pane shows two CNAME records to publish.
The host names are always selector1._domainkey and selector2._domainkey. The targets depend on when the domain was added:
Older format: selector1-example-com._domainkey.TENANT.onmicrosoft.com, where TENANT is your initial domain prefix.
Newer format for custom domains added from May 2025: a target ending in dkim.mail.microsoft that includes a partition segment such as n-v1.
Either way, copy the values exactly as the portal shows them. You can also read them with PowerShell.
Run this in Exchange Online PowerShell on your computer. Replace example.com with your domain. Format-List picks the properties to show. Good output shows both CNAME targets and Enabled : False before you turn signing on. If the command says no configuration exists, create one with New-DkimSigningConfig -DomainName example.com -KeySize 2048 -Enabled $false; -KeySize 2048 requests a 2048-bit key and -Enabled $false creates it without signing until DNS is ready.
Each should return the matching target from the portal. If your DNS is on Cloudflare, set these records to “DNS only” (gray cloud): a proxied CNAME answers with Cloudflare’s own addresses instead of the target, and DKIM lookups fail. Bad output is nothing (often a doubled host name) or a target that differs from the portal by a character.
Turn signing on
Back on the DKIM tab, switch on “Sign messages for this domain with DKIM signatures”. If the portal says the CNAME records do not exist, DNS has not propagated or the values do not match; wait and recheck with dig. In PowerShell the equivalent is Set-DkimSigningConfig -Identity example.com -Enabled $true. The status should show Valid. Microsoft can later rotate keys between the two selectors without you changing DNS again, which is why there are two records.
Step 6: Add DMARC
Add a TXT record with host _dmarc.
v=DMARC1; p=none; rua=mailto:REPORT_ADDRESS
p=none starts in monitoring mode; rua names the mailbox or report service that receives daily aggregate reports, so replace REPORT_ADDRESS with one you will actually read. Check it with dig _dmarc.example.com TXT +short: good is one line beginning "v=DMARC1;. When the reports show your real mail passing, tighten to p=quarantine, then p=reject. Interpreting reports is covered in the separate guide on spoofing and DMARC reports.
Step 7: Website email and SMTP AUTH
Many WordPress sites send form notifications by logging in to a Microsoft 365 mailbox over SMTP: server smtp.office365.com, port 587, STARTTLS, using the mailbox’s address and password. This is called SMTP AUTH client submission, and it is the part of a Microsoft 365 setup most likely to break.
SMTP AUTH may be switched off
SMTP AUTH can be disabled for the whole tenant and per mailbox, and Security defaults block legacy sign-in methods. A typical error is 535 5.7.139 Authentication unsuccessful, SmtpClientAuthentication is disabled for the Tenant. Check the settings in PowerShell.
Run these in Exchange Online PowerShell. MAILBOX_ADDRESS is the mailbox your website signs in as. True at the tenant level means SMTP AUTH is off unless a mailbox overrides it; a blank value on the mailbox means it follows the tenant setting, False means it is allowed for that mailbox. You can allow one mailbox with Set-CASMailbox -Identity MAILBOX_ADDRESS -SmtpClientAuthenticationDisabled $false.
Basic authentication is being retired
Microsoft has announced the retirement of basic authentication (username and password) for SMTP AUTH and has changed the timeline more than once. Its January 2026 update says basic authentication for SMTP AUTH will be disabled by default for existing tenants at the end of December 2026 (administrators can switch it back on for now), new tenants created after that will not have it, and the final removal date will be announced in the second half of 2027. When it is blocked, sending fails with 550 5.7.30 Basic authentication is not supported for Client Submission. Check the Exchange Team blog on techcommunity.microsoft.com for any later change. For website mail, the durable options are an SMTP plugin that connects to Microsoft 365 with OAuth or the Microsoft Graph API, or a transactional email service with its own SPF and DKIM on your domain. Plugin setup and testing are covered in the separate guide on WordPress not sending email.
wp eval 'var_dump( wp_mail( "YOUR_TEST_ADDRESS", "Microsoft 365 test", "Sent from the website after the Microsoft 365 setup." ) );'
Run this over SSH in the site folder. Replace YOUR_TEST_ADDRESS with an outside mailbox you can open. bool(true) means WordPress handed the message on, not that it was delivered; bool(false) means it failed locally, and your SMTP plugin’s log will show the server’s error code.
Step 8: Test end to end
Send a message from Outlook to an external Gmail account and open Show original. You want SPF PASS, DKIM PASS with your domain (not onmicrosoft.com) and DMARC PASS. Repeat with a website form notification. Microsoft’s Remote Connectivity Analyzer (testconnectivity.microsoft.com) can test autodiscover and inbound delivery, and its Message Analyzer reads pasted headers.
The admin center’s Domains page should eventually show the domain as Healthy. It sometimes flags records you deliberately chose not to add, such as Teams records; that warning is safe to ignore if email works and the email records are correct.
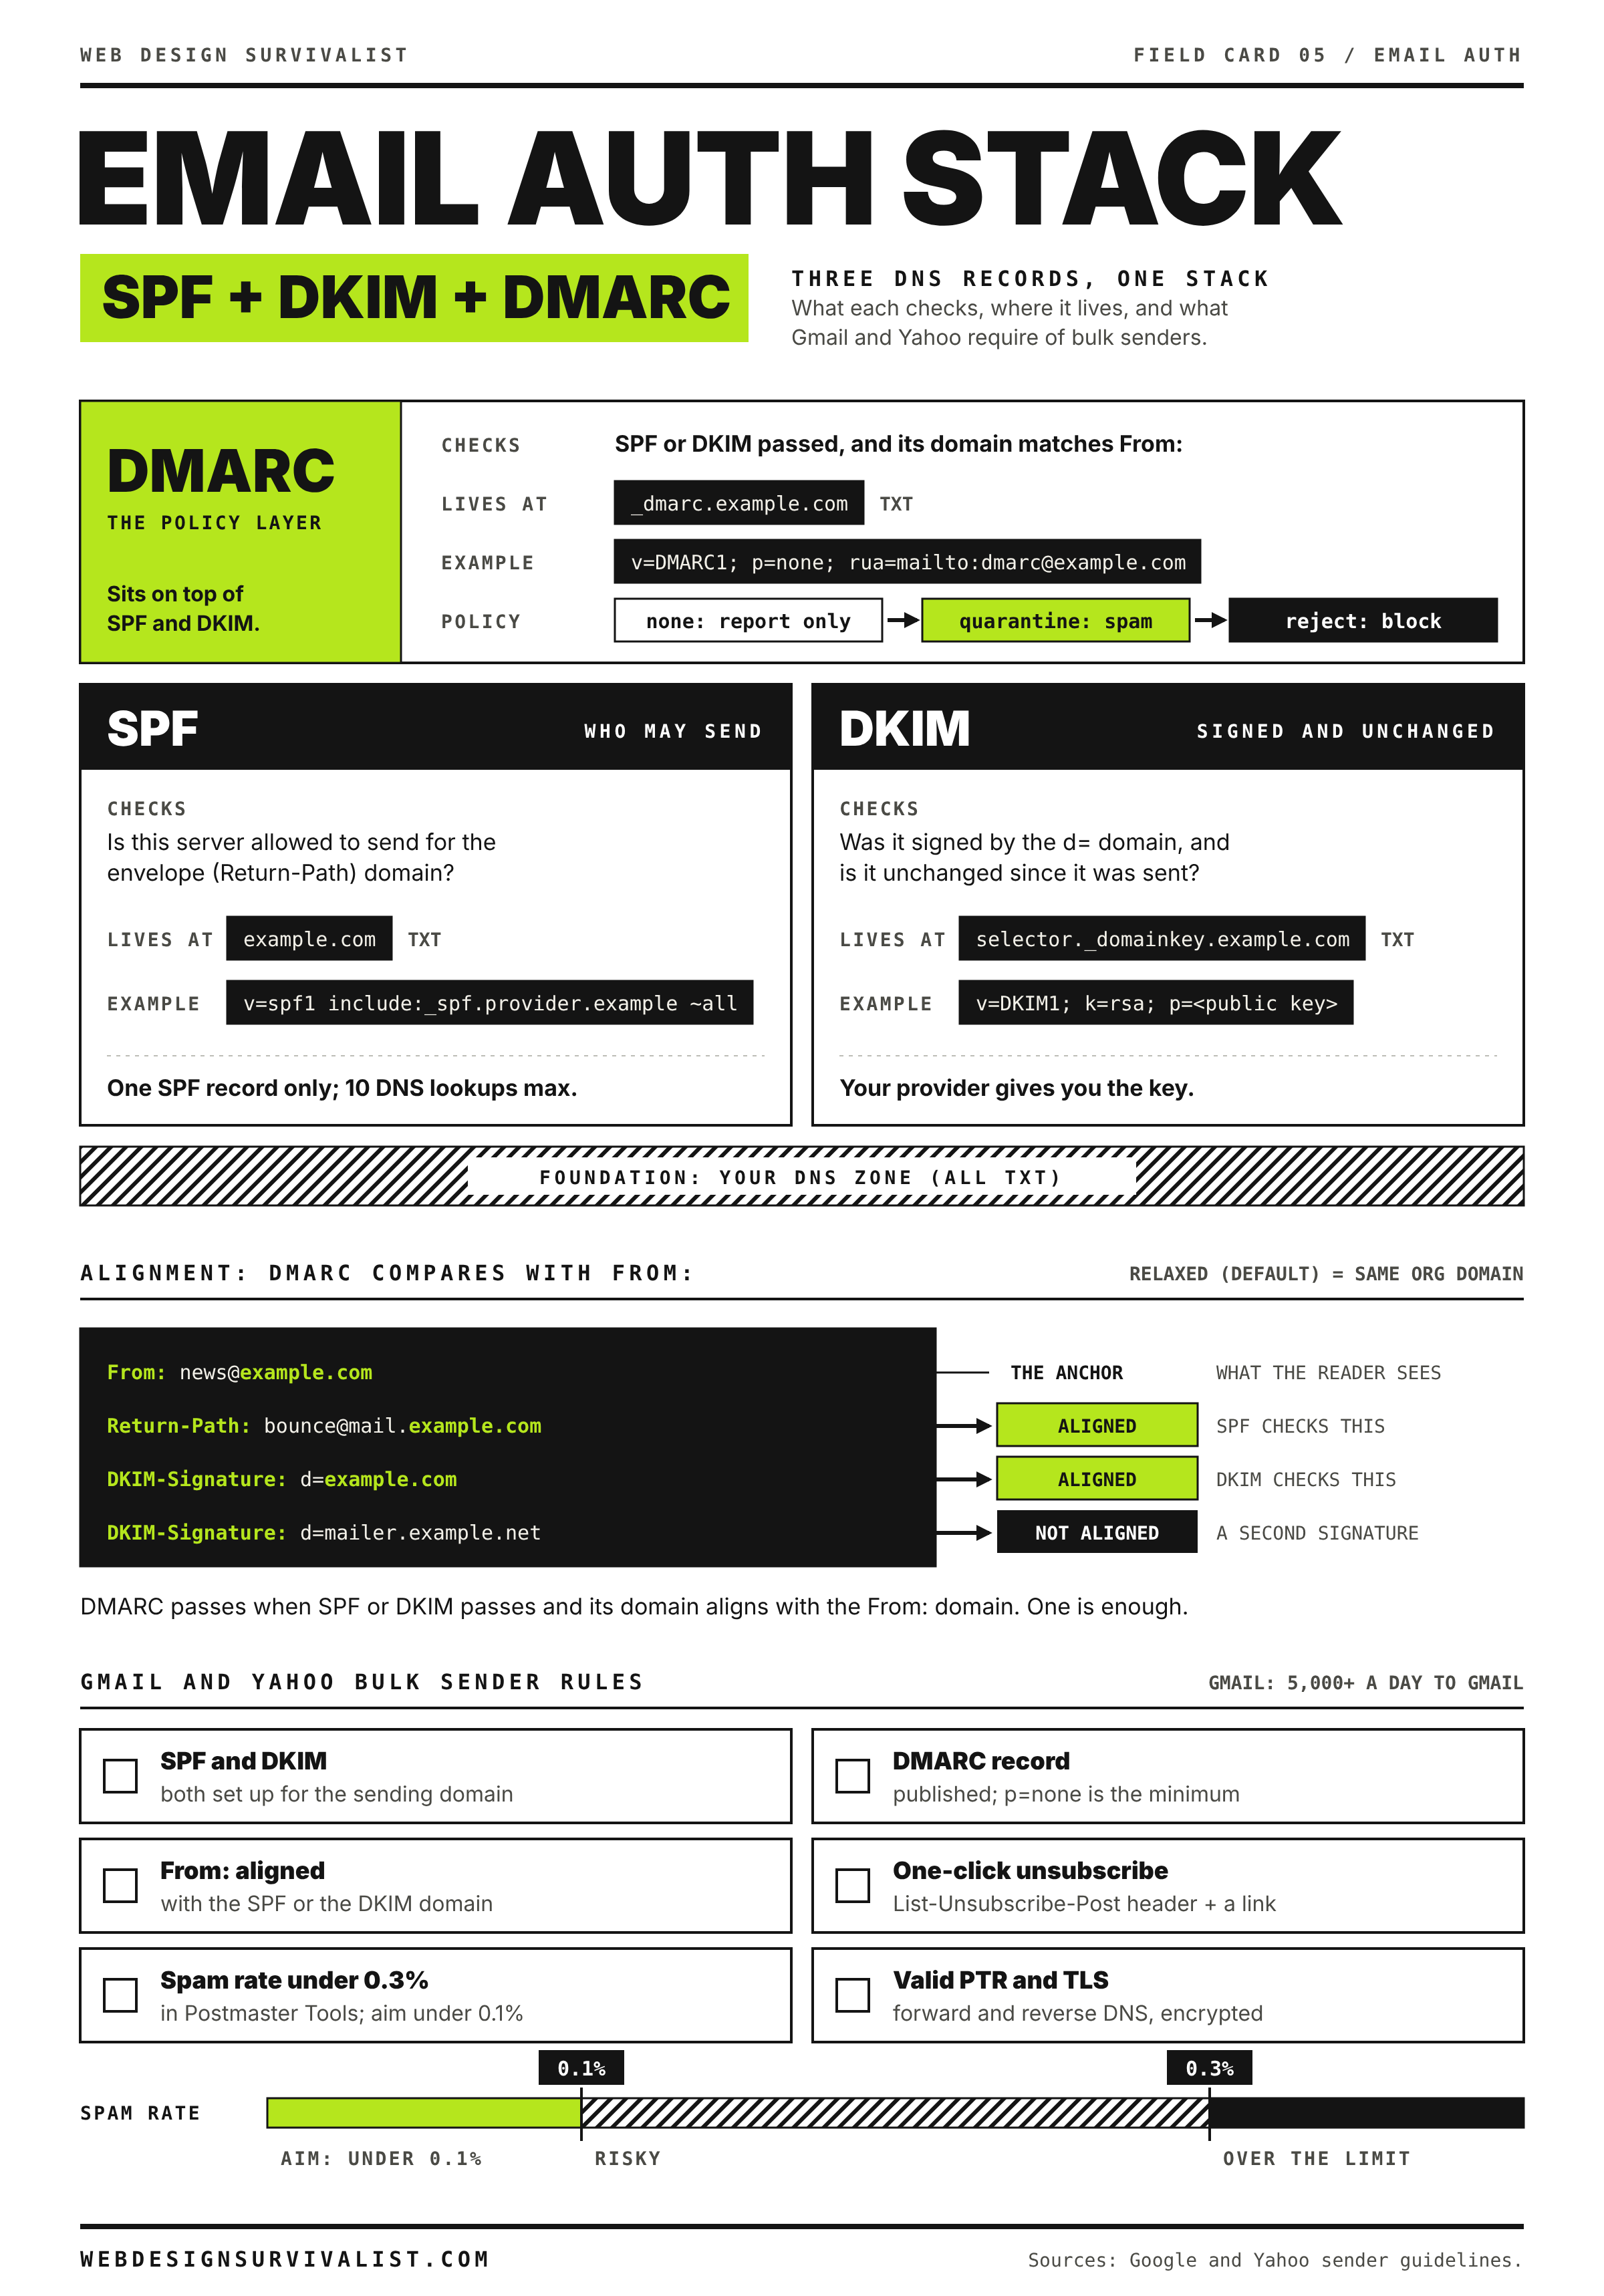
Field card 05: Email authentication stack: SPF, DKIM and DMARC. Print it on any black and white printer. All field cards
When a message fails, the receiving server’s Authentication-Results header explains why. In Outlook on the web, open the message, choose the three-dot menu, then View, then View message details. Look for:
spf=pass (sender IP is ...): the sending IP matched your SPF record. spf=softfail or fail means the sending server is not in it.
dkim=pass (signature was verified) header.d=example.com: signed with your domain. header.d=TENANT.onmicrosoft.com means DKIM for your domain is not enabled yet.
dmarc=pass action=none header.from=example.com: aligned and passing.
compauth=pass reason=100: Microsoft’s composite authentication result for mail it receives. A fail here on inbound mail explains why Microsoft sent a message to Junk.
To rotate DKIM keys later, use Rotate-DkimSigningConfig -Identity example.com -KeySize 2048 in PowerShell or the rotate option on the DKIM tab. The new key goes live on the other selector after a delay, which is why both CNAMEs must remain published permanently.
When to contact your host
Microsoft support handles tenant problems such as verification that will not complete or DKIM keys that will not create. Open a ticket with your web or DNS host when:
the DNS panel rejects or rewrites CNAME or TXT records;
an autodiscover record keeps reappearing for the host’s own mail service;
outbound SMTP from the web server to port 587 is blocked.
Send the domain, your dig output for each record, the exact SMTP error code and text from your plugin’s log, the times of failed attempts in UTC, and the headers of a failing message. The diagnostic tools page links DNS and header checkers, and the Emergency Room is the fast path if mail has stopped altogether.
Did this fix it?
Still stuck? Start again from what you can see in the Emergency Room.
Still stuck?
Print a free one-page checklist to keep, or open the Emergency Room if the symptom does not match.
The new website is live but email has stopped. Changing nameservers moved your whole DNS zone, and the MX, SPF, DKIM and autodiscover records did not come with it. Here is how to put them back.
Your phone or Outlook keeps asking for the email password, or mail sits in the Outbox. Find out whether it is the password, the sign-in method, the server name or the port, and fix it.
Microsoft 365 from GoDaddy signs you in through GoDaddy and locks down the admin center. Learn how to confirm federation, weigh your options and move away in an order that keeps mail flowing.