Emails Going to Spam After a DNS Change? Fix SPF, DKIM and DMARC
A DNS or hosting move often drops the records that prove your email is genuine. Check MX, SPF, DKIM and DMARC with dig, read the Authentication-Results header, and fix WordPress mail sending.
You moved DNS to a new provider, changed hosts or switched email services, and now messages from your domain land in spam, bounce with errors like 550 5.7.26 or “message not authenticated”, or vanish. Your website and your email usually share one domain, and both depend on DNS records. During a move, the website records (A, CNAME) usually get copied and the email records (MX, TXT, DKIM) get missed or mangled.
Receiving mail servers now check that mail claiming to be from your domain is authorized to send for it. Since February 2024, Gmail and Yahoo have required SPF, DKIM and DMARC from bulk senders, and SPF or DKIM from everyone else. Missing records no longer just hurt deliverability: they get mail rejected.
The four records, in plain terms
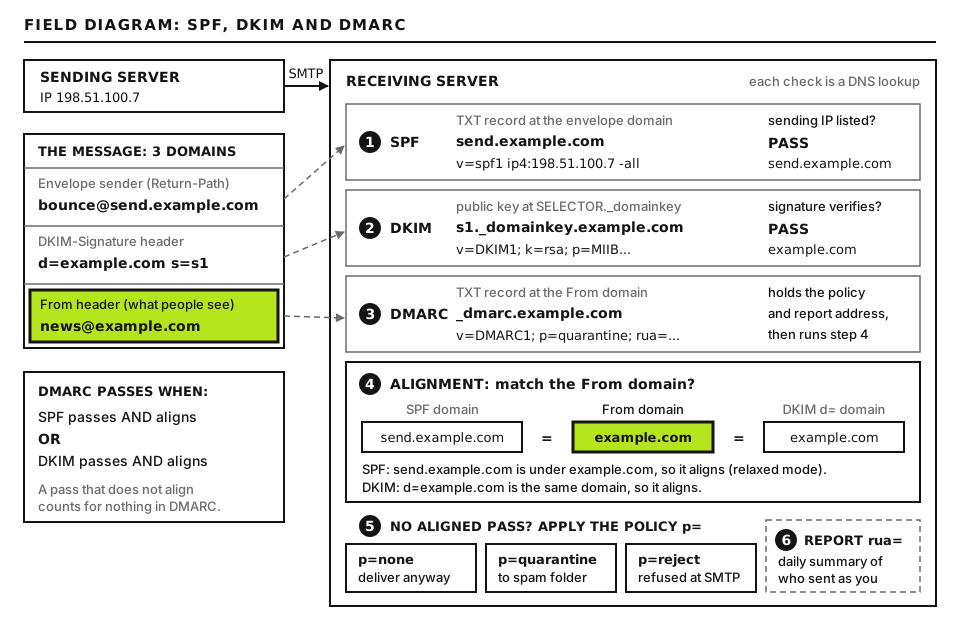
Each check is a DNS lookup. DMARC needs SPF or DKIM to pass and align with the From domain. Open full size
MX (mail exchanger): where mail to your domain is delivered. Wrong MX means you stop receiving mail.
SPF (Sender Policy Framework): a TXT record listing which servers may send mail from your domain.
DKIM (DomainKeys Identified Mail): a public key published in DNS. Your mail service signs each message with the matching private key, and receivers check the signature.
DMARC: a TXT record telling receivers what to do when SPF and DKIM fail, and where to send reports.
Before you start
Access you need: your DNS provider (whoever your domain’s nameservers point to), your email provider’s admin panel, and your WordPress dashboard or SFTP.
Find your old records. If the old DNS provider still has your zone, or you have a backup or screenshot, it is the fastest reference.
Get the right tool. The commands below use dig, included on macOS and Linux. On Windows, nslookup -type=TXT example.com works, as do free online DNS lookup tools.
Where to run the commands. Every dig command runs in a terminal on your own computer (Terminal on macOS, any shell on Linux, WSL on Windows). They only look up public records and change nothing. Replace example.com with your own domain each time, and words in CAPITALS with the values explained next to them. Blocks that start with v= are not commands: they are record values you type into your DNS provider’s panel.
Step 1: Confirm which DNS is live
Changes only count at the nameservers your domain actually uses. Check:
dig NS example.com +short
It prints your domain’s nameservers, one per line, such as ns1.provider.example. (the trailing dot is normal). If the answer shows your old provider, your edits at the new one are not live yet (the nameserver change happens at your domain registrar). To see exactly what a specific nameserver returns, ask it directly: dig @NAMESERVER TXT example.com. Replace NAMESERVER with one of the names the NS lookup printed; the @ sends the question straight to that server, skipping any cached copies. Records also have a TTL (time to live), so old answers can linger in caches for up to that many seconds after a change.
Step 2: Check MX records
dig MX example.com +short
Each line is a priority number and a mail server, for example 10 mx.provider.example.; lower numbers are tried first. An empty answer means no MX record, so mail to your domain cannot be delivered. The answer must match your email provider’s instructions exactly. Google Workspace and Microsoft 365 each publish their own MX values, and your host’s own mail service will have its own. If MX still points at your old host’s mail server, mail to you goes to a mailbox nobody checks.
Step 3: Check SPF
dig TXT example.com +short
This prints every TXT record on the domain, each in quote marks; verification codes from Google and other services are normal. Find the record starting with v=spf1. A typical one looks like this (an example value, not a command; your include: entries come from your own providers):
Exactly one SPF record. Two records starting with v=spf1 is an error and SPF fails for every message. Merge them into one.
Every sending service is listed. Your mailbox provider, your website’s mail service, your newsletter tool and any invoicing or helpdesk system that sends as your domain. Each service documents the include: it needs.
The website’s server is covered. If WordPress sends mail directly from your hosting server and SPF lists the old server’s IP address with ip4:, the move broke it.
No more than 10 DNS lookups. SPF allows at most 10 mechanisms that require DNS lookups (include, a, mx, exists, redirect, and nested includes count). Going over makes SPF fail with a permanent error. Remove services you no longer use.
The ending.~all (soft fail) tells receivers to treat unlisted senders with suspicion; -all (fail) tells them to reject. Start with ~all while you are fixing things.
Some DNS providers mangle long TXT values when records are imported, splitting or wrapping them in extra quotes. Compare the dig output with what you entered.
Step 4: Check DKIM
DKIM records live at selector._domainkey.example.com, where the selector is a name your email provider chooses. Google Workspace uses google by default, Microsoft 365 uses selector1 and selector2 (as CNAME records), and other services name theirs in their setup instructions. Check:
Those two lines use the Google and Microsoft selectors. For any other service, use dig TXT SELECTOR._domainkey.example.com +short and replace SELECTOR with the selector name from that service’s DKIM setup page (if its setup says CNAME, use dig CNAME instead). A working record prints a long value starting v=DKIM1, or for a CNAME, the name it points to. An empty answer means the record is missing, which is the most common casualty of a DNS move because nobody remembers it exists. Copy the value from your email provider’s admin panel exactly. Then confirm DKIM signing is switched on in that panel: some providers will not sign mail until they can see the DNS record, and the switch is separate.
Step 5: Check DMARC
dig TXT _dmarc.example.com +short
A working record prints one line starting v=DMARC1. If nothing comes back, add a TXT record at _dmarc with a monitoring policy:
In your DNS panel, create a record with type TXT, name (or host) _dmarc and the line above as its value. Replace dmarc-reports@example.com with a mailbox you will actually read; the reports are machine-readable files, so a free DMARC report reader helps. p=none asks receivers to deliver mail as normal but send you aggregate reports (the rua address) showing which servers send as your domain and whether they pass. Read the reports for a few weeks, fix every legitimate source that fails, and only then move to p=quarantine and eventually p=reject. Jumping straight to p=reject is a quick way to block your own invoices.
Alignment, the part most people miss
DMARC passes only if SPF or DKIM passes and matches the domain in the visible From address. SPF is checked against the hidden envelope sender (the Return-Path), and DKIM against the d= domain in the signature. A newsletter service that signs with its own domain, or a web server that sends with a Return-Path like user@server123.hostname.example, can pass SPF or DKIM and still fail DMARC. The fix is to set up custom DKIM (and, if offered, a custom return-path) for your domain with each service.
Step 6: Read the headers of a real message
Send a message from your domain to a Gmail address. Open it, click the three-dot menu and choose Show original. Gmail summarizes SPF, DKIM and DMARC as PASS or FAIL at the top. In Outlook, open the message source or properties. The key line is Authentication-Results:
This is an example of what to look for in the message, not a command. Any fail, softfail, none or permerror tells you which record to fix. Free deliverability test sites, where you send a message to a generated address and get a report, show the same information with explanations. Test every system that sends mail, not just your mailbox: the website, the newsletter tool and the invoicing system each authenticate separately.
Step 7: Fix how WordPress sends mail
By default, WordPress sends mail (contact forms, password resets, order emails) through PHP’s mail() function, straight from the web server. That mail often uses a Return-Path on the server’s hostname, is not DKIM-signed for your domain, and comes from a shared IP address, so it fails DMARC alignment or lands in spam. After a host move, the server’s address also changes, which breaks any SPF entry that named the old one.
The reliable fix is to send through authenticated SMTP: either your mailbox provider’s SMTP service or a transactional email provider. An SMTP plugin connects WordPress to it. Then:
Use a From address on your own domain that the service is authorized to send for.
Add that service’s SPF include: and DKIM record to your DNS.
Send a test from the plugin and check the headers as in Step 6.
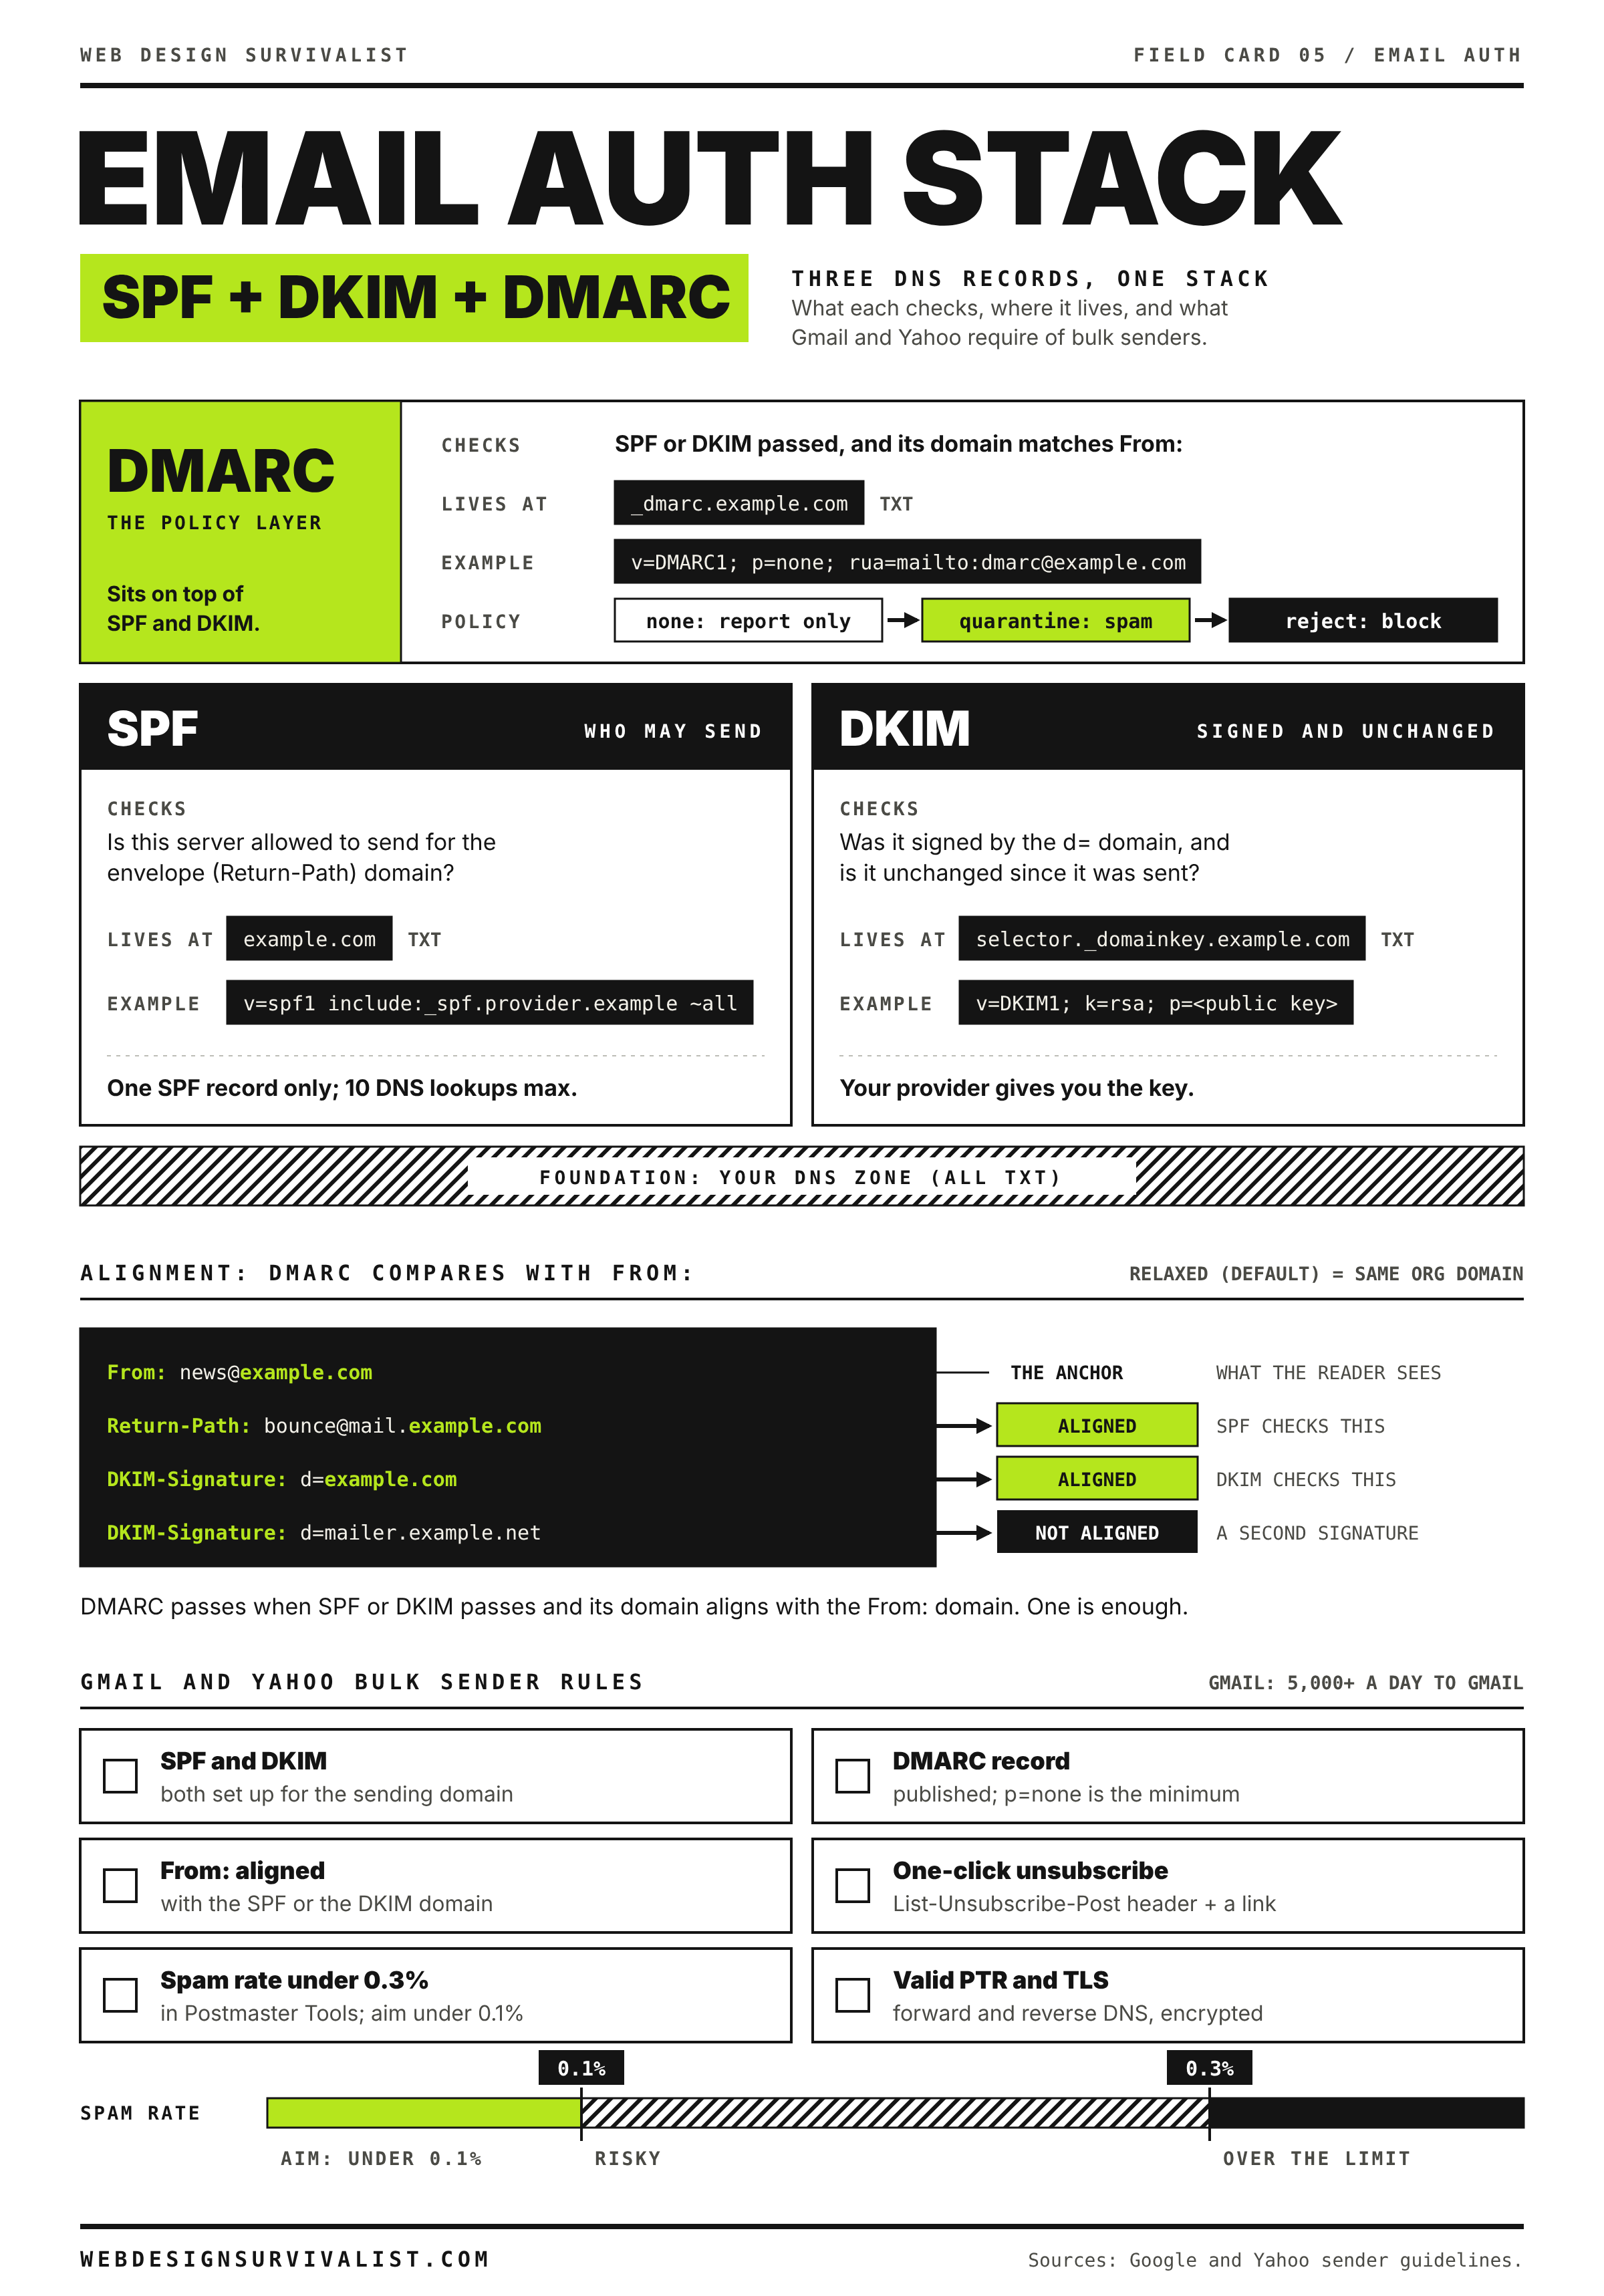
Field card 05: Email authentication stack: SPF, DKIM and DMARC. Print it on any black and white printer. All field cards
Still stuck: when to contact your host or email provider
Contact your email provider if DKIM will not verify after the record is published, or your DNS host if records do not appear in dig results after the TTL has passed. Send them:
The full headers of a failing message, including Authentication-Results.
The exact bounce message and error code, if mail bounced.
Your current MX, SPF, DKIM and DMARC records from the dig commands.
When the DNS or hosting change happened, and which services send mail as your domain.
Did this fix it?
Still stuck? Start again from what you can see in the Emergency Room.
Still stuck?
Print a free one-page checklist to keep, or open the Emergency Room if the symptom does not match.
Bounces mention Spamhaus, Barracuda or “blocked using”? Learn how DNS blocklists work, how to check them by hand, and how to fix the cause before you request removal.
Customers paid but orders sit in Pending payment or On hold, and no order emails arrive. Prove whether the gateway webhook reaches your site, then fix delivery and email.